
Yoga has been used for thousands of years and it is still used today for the improvement of flexibility and for the relief of pain. It is especially beneficial for individuals who suffer from back pain. Unfortunately, more and more people suffer from back pain because of sitting for extended periods at desks.
There are multiple dangers associated with tight hips, a problem that yoga helps to treat. Included among those issues are the following:
Back pain – The pelvis begins to be pushed out of place into a forward position, and this helps to tilt and tighten the muscles. Back pain is a very common complaint of many individuals.
Muscle imbalance – When the hip flexors are not worked regularly, they begin to tighten and shorten. This can lead to a variety of additional problems and it commonly occurs when we sit over extended periods of time.
Posture – Because our hip flexors are such an important stabilizer of our core, it can lead to improper balance and posture when they are weak.
Stretching the hips on a daily basis can help to counteract these difficulties that we experience after hours at a desk. It can also help to strengthen our entire body and provide power to our overall workout.
There are a number of yoga exercises that can be done, but the following 8 are those that you may want to consider.
1. Thread the needle
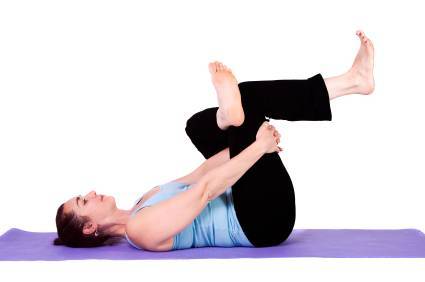
This pose is done while you’re lying on your back with your feet flat on the floor and your knees bent. Cross your right ankle over the left knee to form a figure 4. Keep the hips grounded while pulling left knee toward your chest. At the same time, you would thread your right hand between the legs.
To finish the pose, clasp the hand underneath the left knee to pull the knee for a deeper stretch. Make sure that you focus on your breathing and hold the pose for at least 30 seconds.
2. Happy baby
While lying on your back on the mat, pull your knees into your chest. Place the hands on the inside arches of the feet and open your knees to shoulder width apart or slightly wider. Be sure that you keep your back pressed into the mat as much as is comfortable. Focus on your breathing and hold for at least 30 seconds.
3. Butterfly
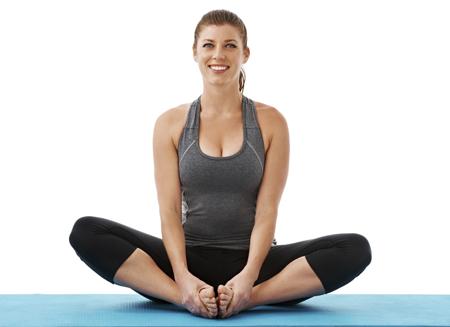
Sit on the bed with your knees bent and your hands at your sides. Bring the soles of your feet together and open the knees to the sides. Your leg muscles should be used to open the knees and bring them as far as is comfortable to the floor. By this point, the stretch should begin to be felt in the inner thighs. You can pull your feet closer toward you to deepen the stretch.
4. Frog pose
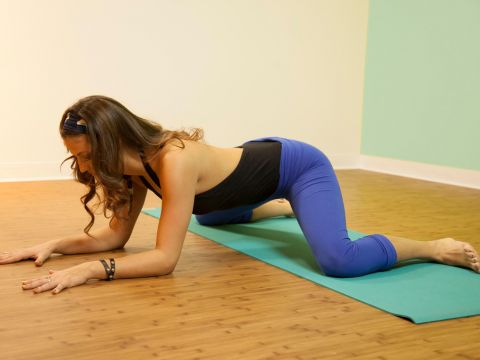
This is an advanced pose, so you would not want to try it if you have any knee or ankle injuries. Get on all fours with your elbows under your shoulders and your knees on the mat. Use extra padding if necessary.
Widen your knees slowly until you feel a stretch in the inner thighs. Keep your ankles in line with your knees and your feet and calves on the mat at all times.
5. Half pigeon
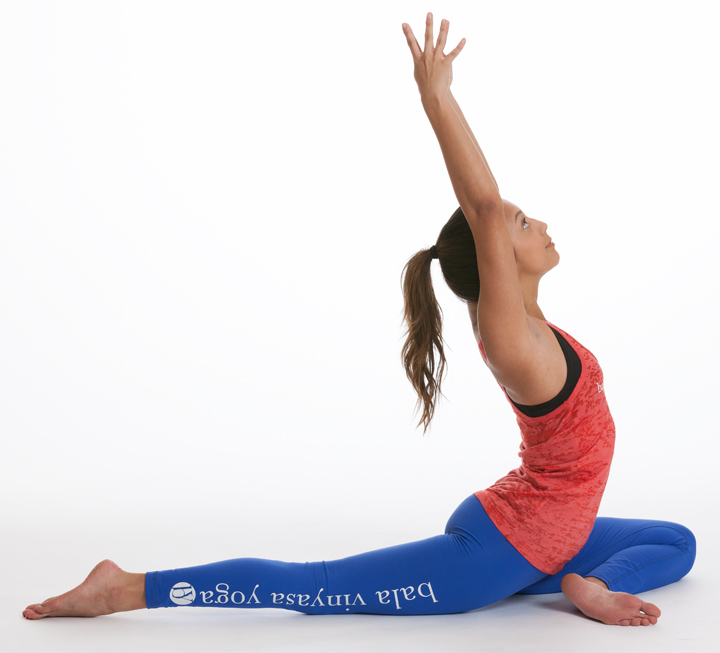
You can start with a runner’s lunge where you put 1 foot forward and both hands on the mat on either side of the front foot. Most of the weight would be put on your hands at this point. Slide the front foot toward the opposite hand and lower than the over the opposite side of the body.
The outside of your opposing test would be placed on the mat so that is parallel to the front of the mat. Lower the back knee and shin to the floor. Square your hips to the front of the mat while maintaining a level of comfort but shooting for a good stretch.
If you want to get more of a stretch, lower your body down to the forearms.
6. Double pigeon
Sit in the cross-legged position with your left foot crossed in front of your right leg. Your arms can be used to help move into the proper pose. Grab the left ankle and pull it into place on the right knee. The shins will need to be stacked on top of one another.
People with tight hips may need to be lifted slightly off of the floor. As you work on this pose, you will eventually gain more flexibility.
7. Low lunge
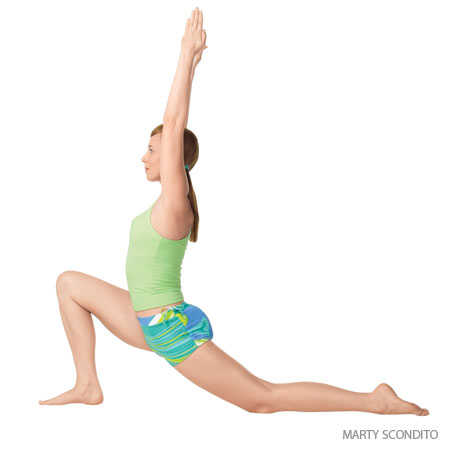
Put your right foot forward and move down into a runners lunge. Your hand should be placed on the mat on either side of the front foot. Lower your back knee and shin to the mat and lift your chest and arms up.
You want to keep your abdominals engaged during this part of the stretch. Be sure that your back is as straight as comfortable or you will lose some of the stretch. Reach arms overhead and lean slightly forward.
8. Crescent lunge
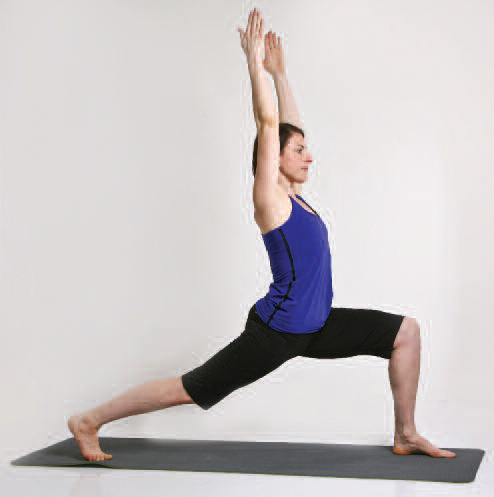
This stretch is also started with a runners lunge but you would keep the body raised. After bring your hands off the mat, they should go up to the thigh and your hips should then sink lower to square them toward the front of the mat.
Put your arms overhead and keep your abdominals engaged. Focus on your breathing and keeping the back straight and lengthened.
Via: The Hearty Soul
Be sure to share this with your friends on Facebook